Fun With Nuance - The Gathering Bundle
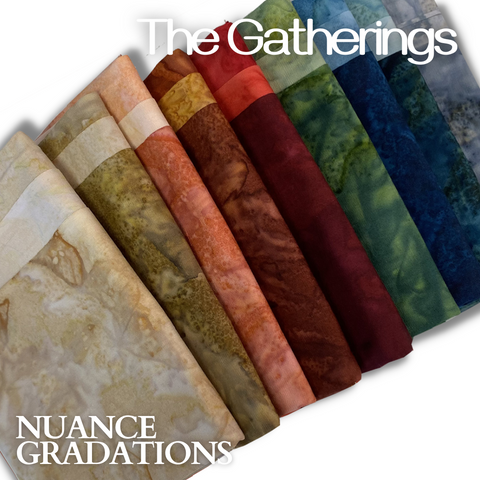
During a Fabric Friday episode we shared a bundle of Nuance Gradation shades that we call "The Gathering".
It's a beautiful array of fall shades including Linen, Brown, Cinnamon, Adobe, Cardinal, Fairway, Copen Blue, Teal, and Blue Nights.
Inspiration
We all get our inspiration for projects from various items we see or from quilt patterns and books. When I decided to work with The Gatherings bundle I realized that a basket in our home was the perfect inspiration for this bundle.

The shades in the basket reminded me of the many shades possible in The Gatherings Nuance Bundle. Look at the similarities.
And, the design inherent in the woven basket was perfect for a simple strip pieced quilt for our couch.
Behold the inspiration for a quilt.
Now, how to put the quilt together. It looks simple and it really is.
The Quilt Design & Construction
I based all the quilt dimensions (pieces and segments) on the dimensions of the fabric in the bundle. My goal is to use as much of the fabric as possible for the entire front and binding of the quilt. Backing will be one of our 115" wide Batik Cotton fabrics.
I started with nine half yard cuts. I like the wide stripe on the basket and decided on a 4" strip that will be pieced together with a simple diagonal join. The join will be a 45 degree angle join, much like that of binding.
I cut three (3) strips from each of the nine fabrics for a total of 27 strips. I sub-cut each strip into 16 1/2" segments. These segments joined together will become the strips for the quilt.
The piecing is simple. If you've ever sewn binding strips together using a 45 degree stitch angle - this is how the segments are joined.

Position the first fabric laying horizontal on your work surface.
Position the second fabric vertically on top of the end of the horizontal fabric. (as shown)
Using your Diagonal Seam Tape, stitch at a 45 degree angle from the upper left point to the lower right point where the two fabrics overlap.

Using a ruler and rotary cutter, measure 1/4 inch to the right of the stitch line and cut away the corners of the fabric.
Save these triangles. We are going to make pillows and other fun projects with all this left over fabric!
This is how easy the pattern is to sew. The only twist is that you need an equal number of strip sets with the join facing left and an equal number of strip sets with the join facing right.
One thing to remember is that the segments are sewn together randomly. There was absolutely no planning that went into which fabric was sewn to the next fabric segment. I did however plan the strips and how they would go together to create the finished quilt top. I used my design wall to help with placement. I didn't want all reds or blues in one place, as an example.
The Finished Top

This is the finished quilt top. However, I did have left over strips and decided to add two more strips sets to the length of the throw. The finished measurement is 56 1/2 x 61 1/2. And - just so you know - there are more leftover segments to make the quilt even larger.
Quilting & Binding
Bruce and I decided on a quilting design that added movement to the top. I'm teaching myself how to longarm, so the easier the better for me right now. We decided on an edge-to-edge design with bubbles. This really gives the quilt a bit of movement and texture. My first thought was oak leaves, or vines and leaves but then I talked my self out of an expected design for something more modern and simple.

The binding will be a scrappy pieced binding from some of the left over strips of fabric. I cut them 2 1/4" wide and joined enough strips to support the quilt.
We selected three possible batik fabrics for the quilt back. We asked you to vote on the backing fabric of your choice. The resounding vote went to the 112" wide Batik Cotton - Hand Dyed shade of Copen Blue.
Thank you everyone - it's the perfect back for this quilt. And, there is enough leftover to back our pillows and coasters.
The Leftovers
I have challenged myself to always make "something" with the leftover cuts from quilt projects. If I don't make something right away it will never get done and the fabric scraps will sit forever without a look.
This project produced an excessive amount of triangles. And - even better - the triangles are already sets. The sets are created as a result of trimming the corners from the segments.
Now - there are three sides to a triangle right? And, there are two ways to stitch two triangles together to get a shape. It's fun to see two different shapes after sewing the triangles together. Let's take a look....

This grouping of triangles will become a pillow top. I'm not done yet, but this will be a beautiful complement to the quilt.
We still have 28 triangles left to play with and those were sewn in a different direction. I'll update this post once the pillow top is finished for both pillows.
We still have more to sew...

We still have these strips leftover. I think I will simply sew them together to create a pillow with simple strips.
Our sofa will end up with a new quilt, three coordinating pillows and two matching triangle coasters.
Stop back to see the updated projects once they are all complete.
In Summary
Find inspiration in anything you see or read. We never know where our next quilt design comes from. It can also be as simple as a coaster or table runner. Nothing complicated is needed.
I hope you enjoyed our little project and share your inspirational projects with everyone.
Comments
Beautiful fabrics. Do the colors bleed?


