
Quilted Tamarack Jacket
I love the fall season.
I love sewing jackets.
I love quilted fabric.
I love a simple pattern with a twist.
All these things pulled together result in a stylish Tamarack Jacket - pattern designed by Grainline Studio's and fabric designed and quilted by SewBatik.
First - Let's talk about the Tamarack Jacket Pattern...
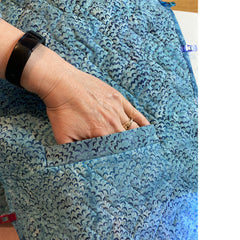
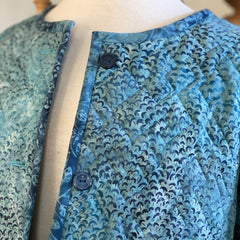
The pattern is designed for sizes 0 - 18. It is meant to be a loose fitting jacket constructed from quilted fabric. It includes welt pockets on the front of the jacket. Since this is a quilted jacket, the entire outer (visible) edge of the jacket is bound with a traditional binding (just like a quilt). You have the option of two front closures - a hook and eye (the facings meet at the center front), or snaps (overlap at the front).
You will see from my picture that I chose a light shade for the outer fabric and a darker shade for the inner fabric. I also decided on buttons instead of snaps.
- Outer fabric: 115" wide Batik Cotton - Lady May - Dusty Topaz
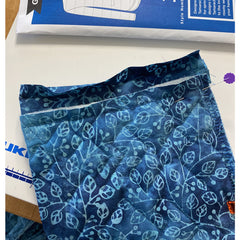
- Inner fabric: 115" wide Batik Cotton - Violetta - Copen Blue
- Batting: Wool Batting ( my next jacket will have thinner wool batting )
- Thread: So Fine - 472 as the top thread and a Madeira Poly/Serger Thread #4960 in the bobbin. In the serger I used a 4-thread overlock with 3 cones of So Fine 472 (2 needles and the upper looper) and the Serger #4960 in the lower looper). I like the thread to match the fabric when working with two different shades of fabric.
- Lots of pattern weights and wonder clips!
- I used an edge-to-edge panto design for the quilting design on my Lenny.
- Size 12 without adjustments
- I'm 5' 7" and did not adjust the sleeve length of garment length at all. It was perfect for me. You may need to adjust this if you are taller or shorter.
Let's Talk Quilted Fabric:
After quilting so much fabric for a few byAnnie bag projects, I decided it was time to let my longarm quilt machine do the quilting for me. This is a lot of fabric to quilt and I really wanted a nice quilting design. I selected a basic diamond design for this project.
I used our 115" wide batik cotton. I decided to cut and quilt more fabric than was necessary for the project (just in case I made a mistake). I cut 48" each of two 115" wide fabrics . After washing the fabric I had 46" x 115" wide fabric available to quilt.
On the quilting machine it went! This was my first experience with computerized quilting and I'm hooked. I was able to yield 37" x 110" of quilted fabric. (Next time I will cut one fabric larger than the other - like a traditional quilt - what was I thinking??? )
The jacket took 29" x 88" of the quilted fabric. The leftover fabric will become a child's jacket (or a laptop case).
NOTE: we will be offering custom quilted Batik Cotton in the near future for projects like this! We need a bit more practice time to feel comfortable providing prequilted batik! Soon, soon!
Make A Sample:

I have to say that making a sample of a garment is truly worth the time and effort. If I'm in a rush I sometimes skip this step. Spending time quilting fabric made me realize that I should not make a mistake and cut pattern pieces that don't fit. Please make a sample shell.
I made a size 12. There is about 3" - 5" of ease in the jacket. I could have made a smaller size, but I based the entire project on my bust measurements. Make note, that if your hips are your pressure point, make the jacket for the ease in the hips and grade the bust to a smaller size. That's more than enough ease for a sweater top.
My issue is always the length from the shoulder to the bust. I didn't have to adjust this pattern at all.
I also used the sample to test the welt pocket design. This was my first welt pocket and wanted to make sure I knew the steps and made my mistakes on the sample garment and not the final jacket.
Let's Cut out the Jacket:
There are 3 main pieces to the jacket; the back (on a fold), the sleeves, and the front (2 pieces).
 |
 |
 |
Working with quilted fabric is interesting - it's a bit bulky at first. I folded the fabric and used my pattern weights to hold the pattern pieces. Pattern weights are perfect for this project because two layers of quilted fabric is too thick for pins.
As I mentioned previously, I used almost all of the 110" wide quilted fabric. Please note - that if you are quilting this on your own domestic machine I would suggest cutting your fabric and batting to fit each individual pattern piece as the pattern describes.
The pattern pieces that did not require quilting are the outside welt pockets, top/bottom inside pocket pieces, and the binding strips. I cut a fat quarter into 5 yards of 2" bias binding for this project. You will also need two small pieces of interfacing for the welt pockets.
Construction Tips:
Please make sure you view my YouTube video for additional tips. I will be adding the YouTube video tomorrow. All the information is here as well.
Welt Pocket:
The first step is to attach the welt pocket to the two front pieces. If you don't want pockets, skip this step. I love pockets and I have never sewn a welt pocket before so I used my sample garment to sew up one pocket. I'm glad I did.
|
 |
When sewing this welt pocket make sure the opening to the pocket is slightly narrower than the welt placket (after it is sewn). This made the world of difference. Also, I used my serger to finish the outer edges of the pocket and hand stitched the bottom edge of the pocket to the inside jacket.
Prepare the Binding:
If you have a 1" binding maker - use it. A binding maker will save you ironing time. I did machine bind the binding to the jacket where indicated. I hand stitched the sleeve hem in place because I find it tedious to stitch binding in the round.
Assemble the Garment:
Garment construction for the jacket is basic, however - plan ahead. I always think about how the seam edges will be finished before I start garment construction. I love a clean serged finished edge. If you don't have a serger, find and use a zigzag stitch or decorative stitch on your sewing machine to secure and finish all the seam edges.
Before any garment construction or binding - I serged the edges along the side seams; on the front and back pieces. I also serged the sides and top of each sleeve. I left the sleeve hem, garment hem, front facing and neckline unfinished as these edges will be bound.
The binding is easy to attach - I used a zipper foot to attach the binding. I find that keeping the pressure to the right of the stitching helped manipulate the binding around the curves. I often switch to a zipper foot for this type of sewing.
I added the binding to the sleeve hem while the sleeve was flat, not in the round. Here are a few images of the steps that I used to add the binding to the sleeve hem.

|
 2. With the binding unfolded, stitch the sleeve seam and side seams starting with the edge of the binding and continuing all the way to the hem of the jacket. |
 3. I opened the side seam, folded the binding down and hand stitched the binding to the inside of the jacket.
|
The basic construction of the jacket - shoulder seams, adding the sleeve, and sewing the side seams from the sleeve hem to the jacket hem is the easy part. The pattern steps are easy to follow.
For the jacket closure I added buttons and buttonholes instead of snaps. I really like the look of coordinating buttons on this jacket. I found buttons that match the lining and binding fabric.
In Summary...
I found the Tamarack Jacket to be a great make and one that I will make over and over again. I'm going to turn this into a vest as well and adjust the sleeve opening by reducing the size of the opening and then binding the edge exactly the same way that I did the sleeve hem.
I hope you love sewing your own Tamarack Jacket and that my experience helped in some way.
Until Next Time...
 |
 |
 |
Comments
Your jacket looks great, Diane! I have a question, though. Did your pattern include the armscye (armhole) dart on the front, and if so, did you just ignore it? The version of the pattern I have in size 20 includes a long dart that goes from the front armhole almost to the bust point, which means you have to seam the darts in the fabric, batting, and lining before you can sandwich and quilt the front pieces, and it also means they are no longer flat at that point. I’d love to know how others who have made this piece are managing that issue.
Great tutorial Diane! I have not sewn clothing for a few years and this made me ready to start again.